Showing posts with label cocktail stick. Show all posts

Thursday, 12 August 2010

Glazing crazy

Glazed beads

The other night I had the bug for taking my beads to the next level. I have been putting the glazing off mainly due to my own laziness. (My old paintbrushes were up in the loft and despite all good intentions, I had not actually managed to encourage my legs to take me up there.)

So I decided to put an end to this procrastination and retrieve the brushes. Still as good as new, I picked a medium sized brush and painted the glaze on my beads. The Sculpey glaze had been sitting there for some time, and was at last unleashed. Instantly when you apply the glaze you can see a wonderful transformation. The glaze really does make a difference. I am not sure if I mixed it up enough, as the bottle suggested, and found that when the glaze had dried after about 30 mins, it didn't seem as shiny as when first applied.

To make matters difficult I have no polystyrene, otherwise I could have put the beads on cocktail sticks and dangled them by poking the sticks in the polystyrene. So to get around this problem I applied the glaze to one side of the bead and had to wait for it to dry before applying to the other side. Of course impatience meant that it's hard to stop myself from messing with the bead before they dried, and I wonder if most of it ended up on my fingers rather than on the actual beads!

Wednesday, 11 August 2010

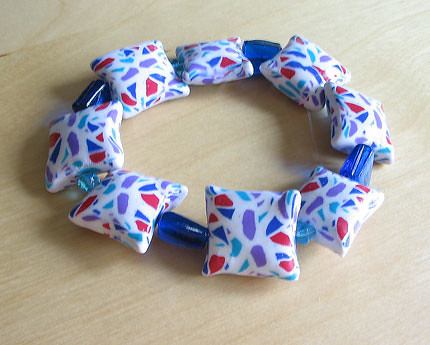
Mosaic pillow beads

Mosaic bracelet

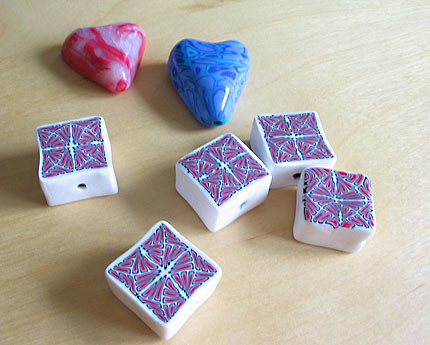
I have been determined to finally produce something which I feel proud to wear, and so gazing down at the various canes I have so far created, I decided to make some beads. Over the past few weeks I have seen some rather nice examples of pillow beads on the internet. The process is manageable, if yet untested, and so I took the plunge. It is easy enough to make pillow beads - just roll a small ball of scrap clay for the inside and add two square slices of clay to each side and press the edges and corners together. I used 1/2cm pieces of the marbled log I had made previously which was about 1cm in diameter. I then cut these into half because I found that the clay was too much for the interior of the bead. In other words, that's 1/4 cm of the log piece for the interior.


I was pleasantly surprised at how nice the pillow beads looked in the end. I'm not saying that they were perfect by any means. I managed to smudge one while trying to pinch the ends. It also took quite a lot of squeezing around the edges and corners to get them into a uniform shape. But not bad for a first attempt.

I baked these in my oven in the usual way (by hanging on cocktail sticks) and when they cooled I decided to string them using the elastic cord my friend had lent to me, and using some random beads I had bought from Ebay. The result was a very pleasing bracelet, which (I admit) brought a smile to my face.

Thursday, 22 July 2010

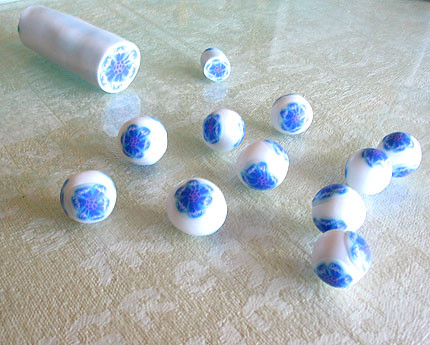
Flower beads

Blue flower beads

Yesterday I had the whole day to myself (how lovely!) and decided to make good use of the time to do some clay work. So with the aim of actually creating a complete bracelet, I decided to use the flower cane I have already made to make some beads. This part of the process is fairly easy. Cut some small pieces of transparent clay for the base bead and then roll in the palms of your hands to make a simple round bead. I made about 10 beads. I then sliced a short piece out of my flower cane and used that to reduce to a smaller size. I do this by squeezing lightly round and round the cane to make it smaller.

After the reduction I started slicing the end off the cane as thinly as I could, although to be honest, sometimes I think it could have been a lot finer. I had to be fairly careful about this because at times I still get some drag, which flattens the flower, but by some gentle squeezing back into shape this wasn't too problematic. On each bead I placed three slices of cane roughly a third way round the bead. This gives a nice even distribution and also leaves some gaps for poking the hole through. I am still using the cocktail sticks for poking the holes.

Here comes my unexpected pleasure of seeing the final beads, followed closely by mild disappointment. Seeing my final beads I was astonished how good they looked for something fairly simple. And I felt a certain pride in what I had achieved. That was until after I retrieved them from the oven. When they were finally baked the transparent clay obviously is no longer white, but at the same time not transparent either. In fact they came out with a slightly yellowish tinge. I have read that clay can go yellow in the oven, but I have never seen it so far until now. I think the real problem is with the transparent clay and I am starting to think that I should have used plain white. In fact I may redo this whole exercise in white to compare.

I did manage to finally string the beads on the elastic cord that my friend gave me, but 10 beads are certainly not enough to go around my wrist. So I am now waiting for a bulk of beads to arrive in the post which should supplement the bracelet and make it more attractive.

Saturday, 10 July 2010

Using the clay gun: Lazy mokume gane

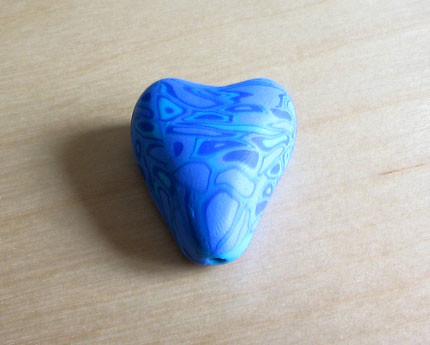
Lazy mokume gane heart

I have already said I have been keen to try out the mokume gane technique which creates a wonderful pattern by shaving layers of clay. So far though I have never actually attempted it. So when I saw a lesson posted on a polymer clay community it really caught my eye.

The tutorial was titled 'Lazy woman's mokume gane', in other words achieve the same effect but with less work. Sounds great and the best part is it involved using my new clay gun.

The process is pretty much the same as how I created the Klimt cane, the only difference being that instead of using a square shaped disc I used a circular one. So you have to prepare the same variation of coloured discs of clay to form the log and then extrude it through the clay gun.

On this occasion I spent more time conditioning the clay and the result was much better, althought the extrusion was still very difficult. I suspect that the best option for using the gun is to only use brand new opened clay for this. It's a shame I find it so difficult to extrude because the best thing about this process is that it involves so few tools ie no pasta machine, no acrylic roller, just your hands and the clay gun.

The result is of course a long log of circular clay. Again the process is to cut into lengths and combine but this time the precision is not really needed because you want that variation of shape and size in the pattern. When you have the final block, what you end up with is a sort of mokume gane effect which is very pretty. (I used the same colours leftover from the previous extrusion).

Again I sliced and created a sheet of this pattern and wrapped it around a ball of scrap clay. Then after a bit of messing around ended up with this heart pendant. I'm quite pleased with the shape of it and with the pattern on the surface. I finished it by poking a hole from the top of the heart throught to the bottom and then baked it suspended from the cocktail stick.

Friday, 9 July 2010

Using the clay gun: Klimt cane

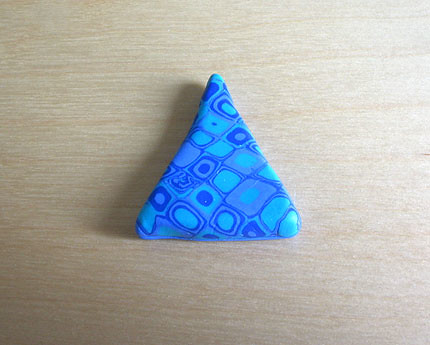
Klimt pendant

Last night I finally took the plunge and unpacked the clay extruder (or clay gun). I had my eye on a lesson in Donna Kato's book on making Klimt canes with the clay gun, ie creating a pattern that looks a bit like a work of Klimt.

So following the instructions, I inserted a square disc in the end of the clay gun and then prepared the clay. The gun comes with a surprisingly large number of discs with a variety of shaped holes in. I'm really pleasantly surprised at how much variety there is.

The instructions then tell you to roll a number of clay logs from several colours. I didn't use the new clay packs for this, I just used some leftovers, because actually you don't need much of each colour. You just need enough to cut some discs of the same size and then combine them randomly into a log. I chose a few colours that I thought would work well together: peppermint, brilliant blue and a light blue mix I had made previously. I then pushed the clay into the gun for the extrusion. Unfortunately, despite Donna's good advice, I didn't condition the clay much at all and this was a really big mistake. The clay was already leftover which means it had gone slightly hard, and even though I had made it fairly soft, I should have spent a lot more time softening it.

The result was that pushing the clay through was a really hard job. I can't emphasise how hard it is. Even when you think the clay is quite soft it is still difficult to extrude when packed into the gun. Of course the fact I hadn't conditioned it well also meant that the extruded clay came out with cracks in the sides. My hands are still sore as a result of the extrusion.

The result is a long snake of square clay which you divide and press together to form a block and then the result is a rather lovely pattern. Again I still haven't got my head around the magic of how the pattern is created but you can see how the gun creates the variation of colour throughout the extruded clay.

The great thing about this is that it is very easy to slice the end of the block and create a sheet out of this pattern. You can roll it and make the sheet larger and even if you warp the pattern it still looks great. However, one extrusion is really not enough, so in future I would definitely make several to form a bigger block.

The final part of this was to decide what to do with the final sheet. This is where I find the task quite difficult. I chose some scrap clay and wrapped the sheet around it to form this sort of triangular pendant. I'm not really happy with the final shape and I really need to find a better way of doing this as its a real problem. Finally I poked a hole through the top corner and baked on the cocktail stick.
Thursday, 24 June 2010

Natasha beads and a little bit extra

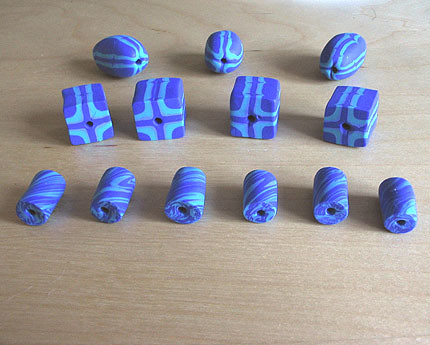
Feather beads

I don't accept defeat very well and admit I wasn't happy with my Natasha bead attempt, so when I discovered this tutorial for feather beads on Polyzine I had to try again. I picked three remaining lumps of brilliant blue, peppermint and a pale blue mix that had resulted from using the pasta machine on some leftover mixed clay. This seemed like a fairly nice combination, and besides I am now running low on my choice of coloured clay.

Following the instructions, I decided that this time I would surely succeed! Starting with a basic bullseye cane and wrapping with sheets of varying colours I finished the cane. Simple enough. You flattern the log into a square cane and then using a 'credit card' to make indentations into the log on all sides, thus creating the pattern on the inside. I'm lazy enough not to go get a credit card and instead grabbed a square cutter (part of a set I had just purchased on Ebay). The thick edge of the cutter was just right for making the indentations without slicing too thinly. Then the tricky part: cut the cane up into pieces and again use the Natasha bead technique of mirroring the internal pattern of each piece by slicing it in four. Again I couldn't really follow the instructions and while puzzling over it, I noticed one of the photos on the webpage which showed that in fact all you need to do is slice in quarters ie one slice vertical, one slice horizontal. You then literally turn all four corners inside out. It's far easier to see how this works working with the bullseye cane because you can see where the joins are!

So now, I think I've understood it, but despite this I still found it a little tricky to recontruct the four corners, because I usually find I have cut one corner slightly larger than the other. I managed to correct this by slicing off the edges to resize. This is also useful for when you smear the faces or get some bits of clay contamination, as it's so easy to just slice the edge and it is once again perfect.

I decided to experiment with the shapes of the final beads, in a smiliar way to the photos on the webpage, so I made a few oval and some I left square. I could use these interchangeably in one necklace, depending on how they look together, but I would need to find something to string them on.

At the end I was left with one small lump of clay from the bits I had sliced off and tried marbling a heart out of it. Not overly impressed with the result, I rolled a log and chopped it up into small tube shaped beads. I then poked a hole through them using cocktail sticks and dangled them from the ledges of my takeaway tray and baked them in the oven. So the result was three different shaped beads, and I was fairly pleased by all, strangely even by the little tube beads which show how effective marbling can be. The main things I would improve if I repeated the process would to be to add more colours in the original bulls eye cane and to make far more indentations to create a more intricate pattern.

Sunday, 13 June 2010

Almost...but not quite

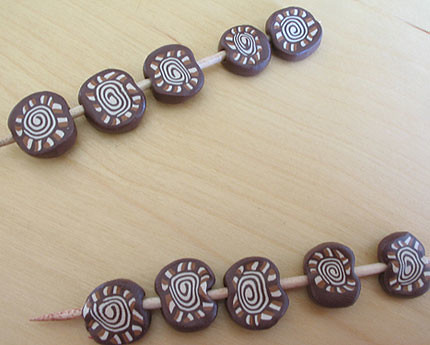
Chocolate jelly roll

Last week I took the plunge and bought Donna Kato's Millefiori techniques book. Admittedly trying to mimic anything that she does seems rather too ambitious, but her work is an inspiration if unattainable.

The initial part of the book was actually very useful for laying down some basics, such as choosing the right clay, storage etc. (It was useful to learn for example that Fimo is the hardest clay to use, so it makes sense for me to use Fimo Soft just to make the process that little bit easier.)

Surprisingly many of the tutorials in the book seemed achievable, although putting them into practrice may be considerably more difficult! I am yet to find out. Despite this I was drawn to one photograph near the beginning of the book, which had not even been created by the author herself. For some reason this particular piece of jewellery took my interest, so rather than starting to follow one of the tutorials, I decided I would try to recreate some of the beads in the photo.

For this I bought three packs of clay, chocolate, caramel and sahara in Fimo Soft. Donna Kato's instructions for creating a jelly roll cane were very helpful and I found this part of the process quite easy. The next step involved following her instructions on creating a stripy border. Again this was a fairly simple process of creating the stack and placing the strips around the outside. Then wrapping a layer of chocolate around the outside of the cane. All well and good so far.

The problems arose when I started slicing the cane and discovered that I was distorting the shape. I took an unused blade and sliced with that, confirming the fact that the blade I had been using was in fact blunt. With the new blade I sliced about 10 slices off the cane with the aim to bake them as flat round beads. Unfortunately I had sliced them too thin because, as you can see from the photo, the cocktail stick distorted the shape as I pierced them through.

I decided not to bake the final beads and have to admit that this minor setback left me feeling somewhat despondent. But from all of this I can say I have learnt something valuable, something which Donna in her book had also commented on. The problem was in the size of the cane to begin with. It was just too small. Far better to create a larger cane and reduce down. This no doubt retains the shape and pattern of the cane when slicing. I have been working on false economy; trying to use less clay in my projects which in fact has just resulted in more waste. My aim is to get back to the basics, roll a suitably sized cane that will retain its shape.

Wednesday, 26 May 2010

Here's what I did earlier (part one)

Black beads
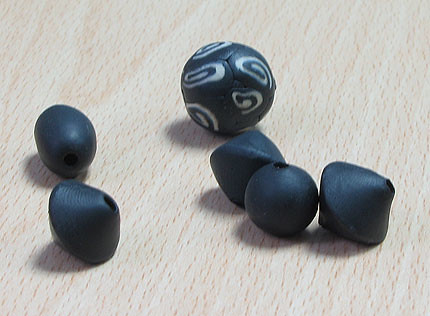
My very first experiment using polymer clay was simple: make a bead - in a vaguely bead-like shape using one colour. Nothing fancy. For these I bought a bead roller, which is useful for creating beads of mostly the same size and shape. You can probably manage without, by cutting pieces of clay to the same size, but using the bead roller is interesting in itself. It gives you a little circular tool to press a bit of clay in and that is your measure so that all your beads end up the same size. My bead roller makes 3 different shapes.

I used cocktail sticks to pierce the bead at each end. I think you can buy special bead pins for this purpose but I'm improvising! The cocktail sticks are useful for the baking process, because you can't really lay a round bead on a flat surface in the oven, it's better to suspend them. Otherwise you could end up with a gloopy mess. To suspend the beads I've been using aluminium take-away trays and cut slits in the edge to hold the cocktail sticks. It kind of works but it's fiddly and I'm sure there are far better ways to do this.

The black and white bead at the back was the next step - trying to incorporate two basic colours and add a pattern. It's a fairly straightforward process. You start by rolling a basic bead of any colour. Then you roll out two pieces of different coloured clay with a rolling pin -they have to be the same size so you need to have something to cut it with, like a tissue blade. Then you put one piece on top of the other and roll them together to create the spiral. So this was my first cane. You then slice little pieces off the end of the cane and press them onto the outside of the bead until it is covered with little swirls. It's obvious in the photo that I haven't quite got my tissue blade to make a clean cut as the swirls have been smudged. You can also see where the pieces have touched on the surface of the bead. I've read that this can be sanded down after firing but I've yet to try it.