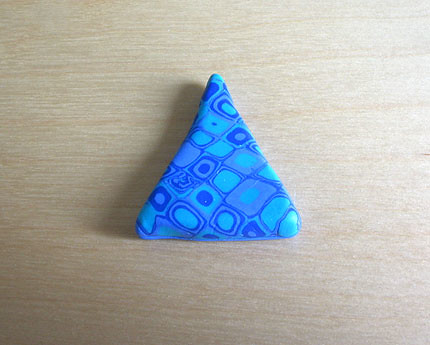
Last night I finally took the plunge and unpacked the clay extruder (or clay gun). I had my eye on a lesson in Donna Kato's book on making Klimt canes with the clay gun, ie creating a pattern that looks a bit like a work of Klimt.
So following the instructions, I inserted a square disc in the end of the clay gun and then prepared the clay. The gun comes with a surprisingly large number of discs with a variety of shaped holes in. I'm really pleasantly surprised at how much variety there is.
The instructions then tell you to roll a number of clay logs from several colours. I didn't use the new clay packs for this, I just used some leftovers, because actually you don't need much of each colour. You just need enough to cut some discs of the same size and then combine them randomly into a log. I chose a few colours that I thought would work well together: peppermint, brilliant blue and a light blue mix I had made previously. I then pushed the clay into the gun for the extrusion. Unfortunately, despite Donna's good advice, I didn't condition the clay much at all and this was a really big mistake. The clay was already leftover which means it had gone slightly hard, and even though I had made it fairly soft, I should have spent a lot more time softening it.
The result was that pushing the clay through was a really hard job. I can't emphasise how hard it is. Even when you think the clay is quite soft it is still difficult to extrude when packed into the gun. Of course the fact I hadn't conditioned it well also meant that the extruded clay came out with cracks in the sides. My hands are still sore as a result of the extrusion.
The result is a long snake of square clay which you divide and press together to form a block and then the result is a rather lovely pattern. Again I still haven't got my head around the magic of how the pattern is created but you can see how the gun creates the variation of colour throughout the extruded clay.
The great thing about this is that it is very easy to slice the end of the block and create a sheet out of this pattern. You can roll it and make the sheet larger and even if you warp the pattern it still looks great. However, one extrusion is really not enough, so in future I would definitely make several to form a bigger block.
The final part of this was to decide what to do with the final sheet. This is where I find the task quite difficult. I chose some scrap clay and wrapped the sheet around it to form this sort of triangular pendant. I'm not really happy with the final shape and I really need to find a better way of doing this as its a real problem. Finally I poked a hole through the top corner and baked on the cocktail stick.
No comments:
Post a Comment