I admit that over the last few days I haven't spent much time on my clay work. I have in fact been decorating the house! However, I have been quite keen on taking the jewellery making to the next level. In other words, finding out the basics of making jewellery. Its painful that I can't do anything useful with the things I have made so I need to start learning.
I stumbled across the most amazing store in Lichfield which is amazing not just because it sells all the bits and pieces you need, but because of the very helpful beginner's sheets on the website.
This is wonderful for someone like me who hasn't got a clue where to start. Simple things like knowing what beading wire to buy is a fantastic thing to know.
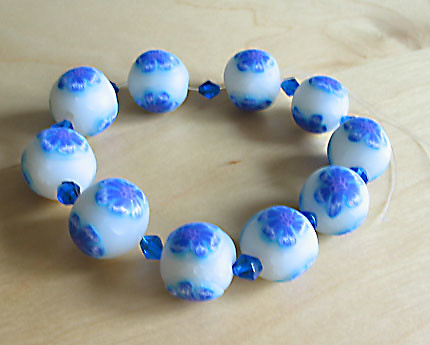
I also have been very excited to see how other people have been using bits and pieces, inparticular bead caps to finish off the design. This bracelet in particular is rather stunning.
Thursday 29 July 2010
Friday 23 July 2010
My own personal critic
The other day I received a lovely little pack of blue and black beads in the post, just perfect for adding a little bit of sparkle to a bracelet. I still have the elastic cord I borrowed from my friend, so last night, while watching tv, I started to experiment with stringing the beads on the cord in various combinations. What I ended up with is a bracelet consisting of my flowers beads and some little blue bicone beads. Since making it I have gazed at the finished bracelet for some time and decided that something is not quite right. Yes the colours match quite nicely, the cord is about right to grip around my wrist, but something is nagging me. It's the voice of my personal critic.
I finally worked out what the problem was. It's the beads I made that I'm not happy with. The finish is just not good enough. In truth there is no finish to speak of. To start with I didn't measure the clay to make the beads, so they vary very slightly in size. Secondly, I think I should have sliced the flower cane much thinner. The beads with the thick slices have not been smoothed enough and so you can see where I have added the slices. Thirdly, I should not have used the transparent clay for ther base bead.
What I really need to do is stop procrastinating and start sanding. Now that I know where I have gone wrong I can repeat the process again and hopefully end up with something better. By chance I found a very useful FAQ page with tips on finishing beads.
Thursday 22 July 2010
Flower beads
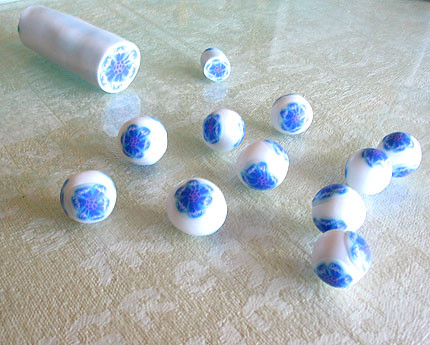
Yesterday I had the whole day to myself (how lovely!) and decided to make good use of the time to do some clay work. So with the aim of actually creating a complete bracelet, I decided to use the flower cane I have already made to make some beads. This part of the process is fairly easy. Cut some small pieces of transparent clay for the base bead and then roll in the palms of your hands to make a simple round bead. I made about 10 beads. I then sliced a short piece out of my flower cane and used that to reduce to a smaller size. I do this by squeezing lightly round and round the cane to make it smaller.
After the reduction I started slicing the end off the cane as thinly as I could, although to be honest, sometimes I think it could have been a lot finer. I had to be fairly careful about this because at times I still get some drag, which flattens the flower, but by some gentle squeezing back into shape this wasn't too problematic. On each bead I placed three slices of cane roughly a third way round the bead. This gives a nice even distribution and also leaves some gaps for poking the hole through. I am still using the cocktail sticks for poking the holes.
Here comes my unexpected pleasure of seeing the final beads, followed closely by mild disappointment. Seeing my final beads I was astonished how good they looked for something fairly simple. And I felt a certain pride in what I had achieved. That was until after I retrieved them from the oven. When they were finally baked the transparent clay obviously is no longer white, but at the same time not transparent either. In fact they came out with a slightly yellowish tinge. I have read that clay can go yellow in the oven, but I have never seen it so far until now. I think the real problem is with the transparent clay and I am starting to think that I should have used plain white. In fact I may redo this whole exercise in white to compare.
I did manage to finally string the beads on the elastic cord that my friend gave me, but 10 beads are certainly not enough to go around my wrist. So I am now waiting for a bulk of beads to arrive in the post which should supplement the bracelet and make it more attractive.
Tuesday 20 July 2010
What a find!
Yesterday, just by accident, I came across the most fabulous website explaining all about how to make beaded jewellery and I have to say that I couldn't quite believe my luck. I can't put into words my excitement when I found it! What is so wonderful about it is that it has pages that explain basic things like how to use crimp beads, what tools you need, right down to what size beading wire to use etc.
Instantly by looking at a few of the projects I can see some potential for how I could use my beads. In particular, this little gem about how to make a pendant necklace caught my eye. It's perfect for using with my lazy mokume gane heart, and simple enough for me to do. What was a real revelation and a useful tip is that there is some explanation on this page about pendants where the holes are too large and for this the solution is to add a bead at top and bottom to hold the wire in place.
Another type of necklace also grabbed my attention. I may use this idea for the kaleidoscope beads I made. I have a pair of pliers at home so that is a start. I just need to go out and find the crimps, the wire and whatever other bits listed in these projects.
Monday 19 July 2010
Thoughts on jewellery making
I have been out to a music festival all weekend so have had no time at all to do any clay work. Despite this I have had plans in the back of my mind to do something useful with the beads I have made. It seems such a shame that they are just sitting in my little plastic box, hidden from view.
So now I have to tackle the challenge of making a piece of jewellery with the beads. Now I have to admit that jewellery making is a mystery yet to be revealed to me. I have so far skimmed through a few books and magazines in my local Hobbycraft but the construction of a simple necklace remains alarmingly complicated. I have literally no thread, cord, wire, findings, beads of any kind to play around with and also no clue where to start. Of course the answer to this is to buy a beginners' guide to jewellery making, but in the meantime another source of information is at hand.
My friend at work has developed a nice little homemade business out of making and selling jewellery and other fashion items, including clothing. She's only just starting this up with a friend but it is interesting to see the ideas she comes up with.
I have managed to identify the fact that you can make a simple bracelet from buying some elastic cord and then threading the beads on that, so this look simple enough to try out. I would like to put some spacer beads in between the beads I have made, so I will hopefully get some off Ebay (althought the size, colour and amount is an added concern). My friend has some elastic cord that she says I can use to string the bracelet. Fingers crossed a finished piece may appear by the end of the week!
Thursday 15 July 2010
My first flower cane

I count this as my first real flower cane (even though I managed to make the petal cane earlier and also tried to make the rather unsuccessful orchid cane of my own design).
This lesson grabbed my eye while I was surfing around Flickr looking at the wonderful creations posted on one of the Polymer clay groups. To be honest I'm not sure that looking at other people's work is a good idea or not, as it can make me feel equally inspired or despondent depending on my mood.
Unexpectedly I discovered one woman's photostream which included tutorials in the form of pictures. This is a nice way to follow the tutorial because it is simple and makes it look strangely easy. I decided to try this Blue flower cane tutorial.
With my lovely new packs of clay I decided to recreate the flower cane, choosing brilliant blue, white and a lilac mix I have left over. Making the skinner blend has become quite easy, although I still managed to mess it up a little bit and had to press it back into an equal layer for rolling. I now use my pasta machine for this as it does make life easier. This skinner blend had a double gradient ie with blue on the edges of the strip and white in the middle, which you then roll up into a cane. I feel pretty confident now making the petal design, it's such a great way to make the veining of the petals.
This time I took more care in constructing the flower, but the bit that I didn't take so much care with was the centre of the flower which is supposed to be made out of a simple lace cane. For the centre I chose the lilac and more blue, but the pattern didn't really turn out very well, and in fact I think it is too large for the flower. So next time I will take more care with this.
I finally padded the flower out in transparent clay and then reduced. The reduction caused some minor distortion around the edges of the petals, and I think next time I will remedy this by adding more layers of transparent around the edge of the cane. Generally though I am happy with this first attempt at a flower cane.
Tuesday 13 July 2010
Storage solutions
Today I found a great little video from Alice Stroppel about storing canes. I have been using little plastic tupperware boxes which I bought from my local supermarket, but it occurred to me last night that maybe I'm not being as organised as I should be.
I tend to have one box which is full of "good clay" ie. clay that is unused or half-used (some still in their wrapping). I try to keep the plastic wrapping around half-used clay so I can remember what colour they are. It can get pretty difficult to distinguish between white and transparent clay when there is no label on them! I then have a box for scrap clay, a box for baked items and a box for canes.
Unfortunately I noticed last night that the cane box is getting rather full. The question of how to best store the canes came into my mind, because you can't continue to add more and have them all stick together. The ideas in the video are really useful, so maybe I will invest in one of those 3 drawer stacks. I'm not sure what they mean about wrapping the canes in wax paper, but I don't think I would have the patience to do this! I think the best solution is probably just to store vertically within the box as suggested in the video.
Monday 12 July 2010
A little chat
The other day one of my colleagues, who does a lot of clay work, brought in some clay jewellery she had bought from a craft fair. The pieces were selling for about £9 and had been made by an American woman.
One of the pieces she showed me was a little pendant in a sort of pine cone shape and it was constructed by adding layers of cane in the shape of leaves around a base bead to create the final pendant.
I was amazed by two things; the first that it was so well done and looked so professional. The detail was excellent and it was so well designed. The second; that I could see how it had been made. The basic ingredient was a leaf cane made out of green and black and with a border added to its edge. This had been reduced down to about a centimetre in size and then slices taken from the cane to build the final pendant. It seemed such a simple idea and yet was so effective.
Now I havent yet had a go at making a leaf cane and it is something I have been meaning to do. I have a tutorial which I found on the internet which shows how you make it. It makes me wonder if I could replicate this idea. Of course the beauty was in the fineness of the detail and I don't think that reducing canes has been my strong point so far, but I am certainly going to try it out.
Saturday 10 July 2010
Using the clay gun: Lazy mokume gane
I have already said I have been keen to try out the mokume gane technique which creates a wonderful pattern by shaving layers of clay. So far though I have never actually attempted it. So when I saw a lesson posted on a polymer clay community it really caught my eye.
The tutorial was titled 'Lazy woman's mokume gane', in other words achieve the same effect but with less work. Sounds great and the best part is it involved using my new clay gun.
The process is pretty much the same as how I created the Klimt cane, the only difference being that instead of using a square shaped disc I used a circular one. So you have to prepare the same variation of coloured discs of clay to form the log and then extrude it through the clay gun.
On this occasion I spent more time conditioning the clay and the result was much better, althought the extrusion was still very difficult. I suspect that the best option for using the gun is to only use brand new opened clay for this. It's a shame I find it so difficult to extrude because the best thing about this process is that it involves so few tools ie no pasta machine, no acrylic roller, just your hands and the clay gun.
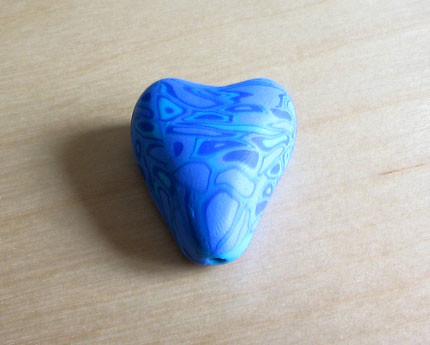
The result is of course a long log of circular clay. Again the process is to cut into lengths and combine but this time the precision is not really needed because you want that variation of shape and size in the pattern. When you have the final block, what you end up with is a sort of mokume gane effect which is very pretty. (I used the same colours leftover from the previous extrusion).
Again I sliced and created a sheet of this pattern and wrapped it around a ball of scrap clay. Then after a bit of messing around ended up with this heart pendant. I'm quite pleased with the shape of it and with the pattern on the surface. I finished it by poking a hole from the top of the heart throught to the bottom and then baked it suspended from the cocktail stick.
Friday 9 July 2010
Using the clay gun: Klimt cane
Last night I finally took the plunge and unpacked the clay extruder (or clay gun). I had my eye on a lesson in Donna Kato's book on making Klimt canes with the clay gun, ie creating a pattern that looks a bit like a work of Klimt.
So following the instructions, I inserted a square disc in the end of the clay gun and then prepared the clay. The gun comes with a surprisingly large number of discs with a variety of shaped holes in. I'm really pleasantly surprised at how much variety there is.
The instructions then tell you to roll a number of clay logs from several colours. I didn't use the new clay packs for this, I just used some leftovers, because actually you don't need much of each colour. You just need enough to cut some discs of the same size and then combine them randomly into a log. I chose a few colours that I thought would work well together: peppermint, brilliant blue and a light blue mix I had made previously. I then pushed the clay into the gun for the extrusion. Unfortunately, despite Donna's good advice, I didn't condition the clay much at all and this was a really big mistake. The clay was already leftover which means it had gone slightly hard, and even though I had made it fairly soft, I should have spent a lot more time softening it.
The result was that pushing the clay through was a really hard job. I can't emphasise how hard it is. Even when you think the clay is quite soft it is still difficult to extrude when packed into the gun. Of course the fact I hadn't conditioned it well also meant that the extruded clay came out with cracks in the sides. My hands are still sore as a result of the extrusion.
The result is a long snake of square clay which you divide and press together to form a block and then the result is a rather lovely pattern. Again I still haven't got my head around the magic of how the pattern is created but you can see how the gun creates the variation of colour throughout the extruded clay.
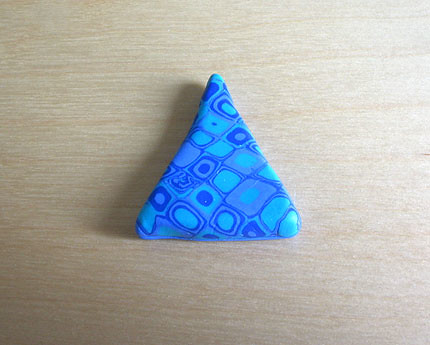
The great thing about this is that it is very easy to slice the end of the block and create a sheet out of this pattern. You can roll it and make the sheet larger and even if you warp the pattern it still looks great. However, one extrusion is really not enough, so in future I would definitely make several to form a bigger block.
The final part of this was to decide what to do with the final sheet. This is where I find the task quite difficult. I chose some scrap clay and wrapped the sheet around it to form this sort of triangular pendant. I'm not really happy with the final shape and I really need to find a better way of doing this as its a real problem. Finally I poked a hole through the top corner and baked on the cocktail stick.
Wednesday 7 July 2010
New arrivals

My new packs have arrived at last, and I'm looking forward to putting them to good use. I decided to order a nice range of colours, as I have a few ideas in mind and want to try them out.
I still have a number of tutorials which I have printed off the internet which I am keen to try. And of course there is the clay gun....
Sunday 4 July 2010
Clay supplies
Today I bought some new clay supplies. Over the past few months I have been buying my clay from a well known UK store called Hobbycraft, where a pack can be bought for just over two pounds. Now I have always thought this quite expensive, because let's face it, those packs are not that large. So the last time I visited I decided that despite the convenience I would no longer buy my clay there if I could help it.
Today I found a much better value store on Ebay, where the packs average out to about £1.50 each. The best way is to buy in bulk rather than buying individual packs, but even when buying in bulk I always calculate the cost per pack (including postage) to compare prices.
It's still of course useful to visit an actual shop just to see the colour range, which is something you can't do when shopping online, however you definitely get better value for money online.
Now I'm waiting for my new clay packs to arrive.
Friday 2 July 2010
Tools for the Klimt cane
The other day a parcel dropped on my mat and it was the clay gun I had bought from Ebay. And what a very exciting purchase it is. I've been dying to try out the Klimt cane technique (a pattern of multiple circles which looks curiously like a work of Klimt) which I have seen dotted around the internet and also in Donna Kato's Millefiori book. So for this purpose alone the gun seems like a very useful little tool. It arrived in pieces so I suppose I have to fix it together.
The process looks fairly simple: roll out several rolls of coloured clay, stack them and squeeze them through the clay gun. However having never used a clay gun before, and in fact having not yet even removed the gun from the packet I have yet to find out if this will prove to be more difficult than expected. Following Donna Kato's instructions it still seems to be a mystery as to how the gun produces the variation of colour but I am sure that magic must happen somewhere along the way.
I do have another minor issue at the moment, which is that I have run out of usable clay. This is why I have been so keen to try out the methods of using scrap clay. It's about all I have left! So I really need to go out and buy a load of new packs.
Subscribe to:
Posts (Atom)