Showing posts with label brilliant blue. Show all posts

Thursday, 15 July 2010

My first flower cane

Blue flower cane

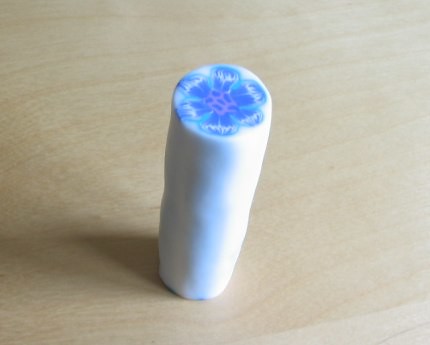
I count this as my first real flower cane (even though I managed to make the petal cane earlier and also tried to make the rather unsuccessful orchid cane of my own design).

This lesson grabbed my eye while I was surfing around Flickr looking at the wonderful creations posted on one of the Polymer clay groups. To be honest I'm not sure that looking at other people's work is a good idea or not, as it can make me feel equally inspired or despondent depending on my mood.

Unexpectedly I discovered one woman's photostream which included tutorials in the form of pictures. This is a nice way to follow the tutorial because it is simple and makes it look strangely easy. I decided to try this Blue flower cane tutorial.

With my lovely new packs of clay I decided to recreate the flower cane, choosing brilliant blue, white and a lilac mix I have left over. Making the skinner blend has become quite easy, although I still managed to mess it up a little bit and had to press it back into an equal layer for rolling. I now use my pasta machine for this as it does make life easier. This skinner blend had a double gradient ie with blue on the edges of the strip and white in the middle, which you then roll up into a cane. I feel pretty confident now making the petal design, it's such a great way to make the veining of the petals.

This time I took more care in constructing the flower, but the bit that I didn't take so much care with was the centre of the flower which is supposed to be made out of a simple lace cane. For the centre I chose the lilac and more blue, but the pattern didn't really turn out very well, and in fact I think it is too large for the flower. So next time I will take more care with this.

I finally padded the flower out in transparent clay and then reduced. The reduction caused some minor distortion around the edges of the petals, and I think next time I will remedy this by adding more layers of transparent around the edge of the cane. Generally though I am happy with this first attempt at a flower cane.

Saturday, 10 July 2010

Using the clay gun: Lazy mokume gane

Lazy mokume gane heart

I have already said I have been keen to try out the mokume gane technique which creates a wonderful pattern by shaving layers of clay. So far though I have never actually attempted it. So when I saw a lesson posted on a polymer clay community it really caught my eye.

The tutorial was titled 'Lazy woman's mokume gane', in other words achieve the same effect but with less work. Sounds great and the best part is it involved using my new clay gun.

The process is pretty much the same as how I created the Klimt cane, the only difference being that instead of using a square shaped disc I used a circular one. So you have to prepare the same variation of coloured discs of clay to form the log and then extrude it through the clay gun.

On this occasion I spent more time conditioning the clay and the result was much better, althought the extrusion was still very difficult. I suspect that the best option for using the gun is to only use brand new opened clay for this. It's a shame I find it so difficult to extrude because the best thing about this process is that it involves so few tools ie no pasta machine, no acrylic roller, just your hands and the clay gun.

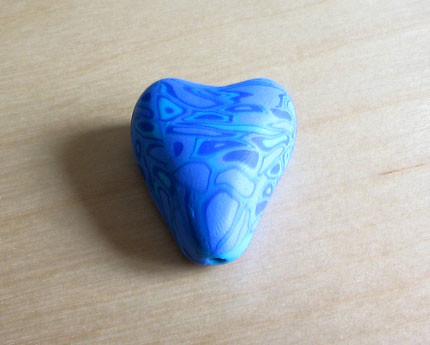
The result is of course a long log of circular clay. Again the process is to cut into lengths and combine but this time the precision is not really needed because you want that variation of shape and size in the pattern. When you have the final block, what you end up with is a sort of mokume gane effect which is very pretty. (I used the same colours leftover from the previous extrusion).

Again I sliced and created a sheet of this pattern and wrapped it around a ball of scrap clay. Then after a bit of messing around ended up with this heart pendant. I'm quite pleased with the shape of it and with the pattern on the surface. I finished it by poking a hole from the top of the heart throught to the bottom and then baked it suspended from the cocktail stick.

Friday, 9 July 2010

Using the clay gun: Klimt cane

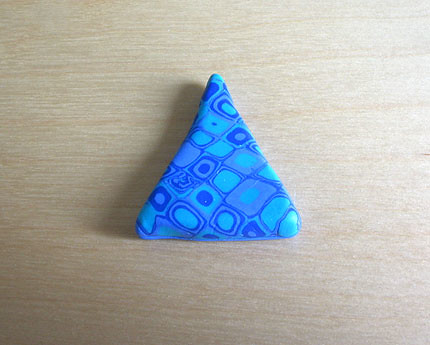
Klimt pendant

Last night I finally took the plunge and unpacked the clay extruder (or clay gun). I had my eye on a lesson in Donna Kato's book on making Klimt canes with the clay gun, ie creating a pattern that looks a bit like a work of Klimt.

So following the instructions, I inserted a square disc in the end of the clay gun and then prepared the clay. The gun comes with a surprisingly large number of discs with a variety of shaped holes in. I'm really pleasantly surprised at how much variety there is.

The instructions then tell you to roll a number of clay logs from several colours. I didn't use the new clay packs for this, I just used some leftovers, because actually you don't need much of each colour. You just need enough to cut some discs of the same size and then combine them randomly into a log. I chose a few colours that I thought would work well together: peppermint, brilliant blue and a light blue mix I had made previously. I then pushed the clay into the gun for the extrusion. Unfortunately, despite Donna's good advice, I didn't condition the clay much at all and this was a really big mistake. The clay was already leftover which means it had gone slightly hard, and even though I had made it fairly soft, I should have spent a lot more time softening it.

The result was that pushing the clay through was a really hard job. I can't emphasise how hard it is. Even when you think the clay is quite soft it is still difficult to extrude when packed into the gun. Of course the fact I hadn't conditioned it well also meant that the extruded clay came out with cracks in the sides. My hands are still sore as a result of the extrusion.

The result is a long snake of square clay which you divide and press together to form a block and then the result is a rather lovely pattern. Again I still haven't got my head around the magic of how the pattern is created but you can see how the gun creates the variation of colour throughout the extruded clay.

The great thing about this is that it is very easy to slice the end of the block and create a sheet out of this pattern. You can roll it and make the sheet larger and even if you warp the pattern it still looks great. However, one extrusion is really not enough, so in future I would definitely make several to form a bigger block.

The final part of this was to decide what to do with the final sheet. This is where I find the task quite difficult. I chose some scrap clay and wrapped the sheet around it to form this sort of triangular pendant. I'm not really happy with the final shape and I really need to find a better way of doing this as its a real problem. Finally I poked a hole through the top corner and baked on the cocktail stick.

Thursday, 24 June 2010

Natasha beads and a little bit extra

Feather beads

I don't accept defeat very well and admit I wasn't happy with my Natasha bead attempt, so when I discovered this tutorial for feather beads on Polyzine I had to try again. I picked three remaining lumps of brilliant blue, peppermint and a pale blue mix that had resulted from using the pasta machine on some leftover mixed clay. This seemed like a fairly nice combination, and besides I am now running low on my choice of coloured clay.

Following the instructions, I decided that this time I would surely succeed! Starting with a basic bullseye cane and wrapping with sheets of varying colours I finished the cane. Simple enough. You flattern the log into a square cane and then using a 'credit card' to make indentations into the log on all sides, thus creating the pattern on the inside. I'm lazy enough not to go get a credit card and instead grabbed a square cutter (part of a set I had just purchased on Ebay). The thick edge of the cutter was just right for making the indentations without slicing too thinly. Then the tricky part: cut the cane up into pieces and again use the Natasha bead technique of mirroring the internal pattern of each piece by slicing it in four. Again I couldn't really follow the instructions and while puzzling over it, I noticed one of the photos on the webpage which showed that in fact all you need to do is slice in quarters ie one slice vertical, one slice horizontal. You then literally turn all four corners inside out. It's far easier to see how this works working with the bullseye cane because you can see where the joins are!

So now, I think I've understood it, but despite this I still found it a little tricky to recontruct the four corners, because I usually find I have cut one corner slightly larger than the other. I managed to correct this by slicing off the edges to resize. This is also useful for when you smear the faces or get some bits of clay contamination, as it's so easy to just slice the edge and it is once again perfect.

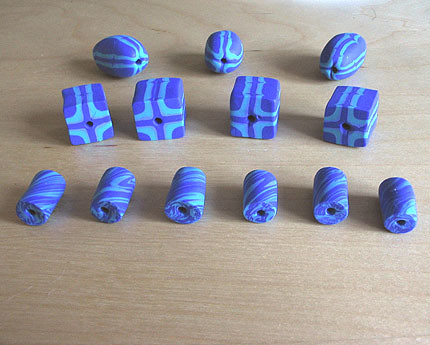
I decided to experiment with the shapes of the final beads, in a smiliar way to the photos on the webpage, so I made a few oval and some I left square. I could use these interchangeably in one necklace, depending on how they look together, but I would need to find something to string them on.

At the end I was left with one small lump of clay from the bits I had sliced off and tried marbling a heart out of it. Not overly impressed with the result, I rolled a log and chopped it up into small tube shaped beads. I then poked a hole through them using cocktail sticks and dangled them from the ledges of my takeaway tray and baked them in the oven. So the result was three different shaped beads, and I was fairly pleased by all, strangely even by the little tube beads which show how effective marbling can be. The main things I would improve if I repeated the process would to be to add more colours in the original bulls eye cane and to make far more indentations to create a more intricate pattern.