I don't accept defeat very well and admit I wasn't happy with my Natasha bead attempt, so when I discovered this tutorial for feather beads on Polyzine I had to try again. I picked three remaining lumps of brilliant blue, peppermint and a pale blue mix that had resulted from using the pasta machine on some leftover mixed clay. This seemed like a fairly nice combination, and besides I am now running low on my choice of coloured clay.
Following the instructions, I decided that this time I would surely succeed! Starting with a basic bullseye cane and wrapping with sheets of varying colours I finished the cane. Simple enough. You flattern the log into a square cane and then using a 'credit card' to make indentations into the log on all sides, thus creating the pattern on the inside. I'm lazy enough not to go get a credit card and instead grabbed a square cutter (part of a set I had just purchased on Ebay). The thick edge of the cutter was just right for making the indentations without slicing too thinly. Then the tricky part: cut the cane up into pieces and again use the Natasha bead technique of mirroring the internal pattern of each piece by slicing it in four. Again I couldn't really follow the instructions and while puzzling over it, I noticed one of the photos on the webpage which showed that in fact all you need to do is slice in quarters ie one slice vertical, one slice horizontal. You then literally turn all four corners inside out. It's far easier to see how this works working with the bullseye cane because you can see where the joins are!
So now, I think I've understood it, but despite this I still found it a little tricky to recontruct the four corners, because I usually find I have cut one corner slightly larger than the other. I managed to correct this by slicing off the edges to resize. This is also useful for when you smear the faces or get some bits of clay contamination, as it's so easy to just slice the edge and it is once again perfect.
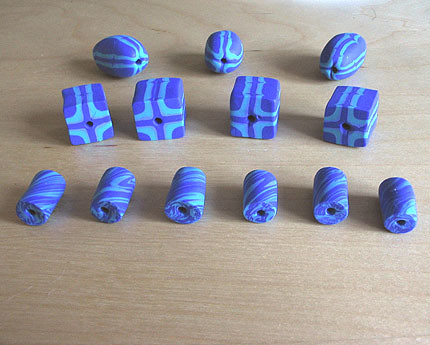
I decided to experiment with the shapes of the final beads, in a smiliar way to the photos on the webpage, so I made a few oval and some I left square. I could use these interchangeably in one necklace, depending on how they look together, but I would need to find something to string them on.
At the end I was left with one small lump of clay from the bits I had sliced off and tried marbling a heart out of it. Not overly impressed with the result, I rolled a log and chopped it up into small tube shaped beads. I then poked a hole through them using cocktail sticks and dangled them from the ledges of my takeaway tray and baked them in the oven. So the result was three different shaped beads, and I was fairly pleased by all, strangely even by the little tube beads which show how effective marbling can be. The main things I would improve if I repeated the process would to be to add more colours in the original bulls eye cane and to make far more indentations to create a more intricate pattern.