Showing posts with label colour mix. Show all posts

Thursday, 24 June 2010

Natasha beads and a little bit extra

Feather beads

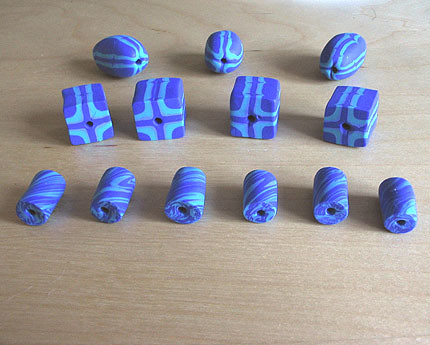
I don't accept defeat very well and admit I wasn't happy with my Natasha bead attempt, so when I discovered this tutorial for feather beads on Polyzine I had to try again. I picked three remaining lumps of brilliant blue, peppermint and a pale blue mix that had resulted from using the pasta machine on some leftover mixed clay. This seemed like a fairly nice combination, and besides I am now running low on my choice of coloured clay.

Following the instructions, I decided that this time I would surely succeed! Starting with a basic bullseye cane and wrapping with sheets of varying colours I finished the cane. Simple enough. You flattern the log into a square cane and then using a 'credit card' to make indentations into the log on all sides, thus creating the pattern on the inside. I'm lazy enough not to go get a credit card and instead grabbed a square cutter (part of a set I had just purchased on Ebay). The thick edge of the cutter was just right for making the indentations without slicing too thinly. Then the tricky part: cut the cane up into pieces and again use the Natasha bead technique of mirroring the internal pattern of each piece by slicing it in four. Again I couldn't really follow the instructions and while puzzling over it, I noticed one of the photos on the webpage which showed that in fact all you need to do is slice in quarters ie one slice vertical, one slice horizontal. You then literally turn all four corners inside out. It's far easier to see how this works working with the bullseye cane because you can see where the joins are!

So now, I think I've understood it, but despite this I still found it a little tricky to recontruct the four corners, because I usually find I have cut one corner slightly larger than the other. I managed to correct this by slicing off the edges to resize. This is also useful for when you smear the faces or get some bits of clay contamination, as it's so easy to just slice the edge and it is once again perfect.

I decided to experiment with the shapes of the final beads, in a smiliar way to the photos on the webpage, so I made a few oval and some I left square. I could use these interchangeably in one necklace, depending on how they look together, but I would need to find something to string them on.

At the end I was left with one small lump of clay from the bits I had sliced off and tried marbling a heart out of it. Not overly impressed with the result, I rolled a log and chopped it up into small tube shaped beads. I then poked a hole through them using cocktail sticks and dangled them from the ledges of my takeaway tray and baked them in the oven. So the result was three different shaped beads, and I was fairly pleased by all, strangely even by the little tube beads which show how effective marbling can be. The main things I would improve if I repeated the process would to be to add more colours in the original bulls eye cane and to make far more indentations to create a more intricate pattern.

Tuesday, 15 June 2010

Leftovers reused: Feather

Feather cane

I'm literally drowning in bits of old dry clay and I really wanted to try using some of that up before I start a new project. So last night I started messing about with the scraps. One pile of clay was an old stripy stack of white and purple that's not going to any good use, so I chopped it up into tiny pieces to create a mix. One thing I can say about the dried up clay is that it's very useful for this kind of activity because it's easy to chop.

I saw a recipe for a Starry night cane in Donna Kato's book which seemed a good idea for these bits and was fairly simple to do: just roll out the chopped up clay and roll through the pasta machine a few times and you get a really great marbling effect. I did this but found it hard to stop and consequently overdid it a little with the pasta machine. So by the time I had created the stack for the Starry night effect I had lost a lot of the line definition. In fact I was closer to creating a plain sheet of lilac! However, this was the first time I had tried marbling and even colour mixing, so still an interesting process.

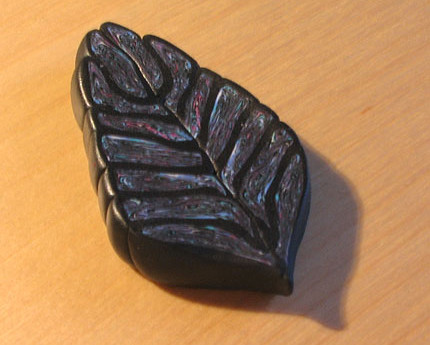
I gave up on the purple and white and instead took a multicoloured chopped up mix of old clay, and remembering the feather idea on Polymerclayweb, I decided to tackle that from memory. I twisted the clay into a streaky log, which gives a pleasing effect and then rolled a black layer around the outside. I then squashed the cane and divided, layering the parts not directly on top of each other, to create the feather. Surprisingly simple to do and makes me realise that with more care a more intricate feather could be achieved. I'm not really sure how I can use this feather, as I imagine it's fairly difficult to reduce, but maybe I'll come back to it later.

Monday, 14 June 2010

Leftovers

Over the past few months I've been experimenting with various colours and have ended up with a lot of waste. Bits off the ends of canes, old stacks and so forth. Not wanting to throw good clay away I have just dropped them into my storage boxes and left them. I picked up a few bits the other day and they've gone dry over time, but it did make me wonder if I could put any use to them.

A colleague I work with, (who is much more skillful then me) dropped her latest creation on my desk this morning. She had created a number of cylindrical beads which had simply been rolled from multiple colours of clay scraps. and created a rather lovely multicoloured necklace.

So I had a look on the web again for some ideas on what to do with some of these old scraps (assuming that they are still usable) and found this really useful page on Polymerclayweb which gives lots of options for how to use them, including mixing new colours, marbling and my favourite: creating swirled lentil beads. It's good to know that no clay has to go to waste, and maybe even with the scraps I could possibly create something useful.