Showing posts with label book. Show all posts

Friday, 18 June 2010

Shaman cane

Shaman cane

Last night a new book dropped on my doormat; Syndee Holt's Polymer Clay for the First Time. I had been looking forward to this, specifically because I had noticed there was a lesson in there about creating pictorial canes. The shaman cane particularly grabbed me, as I do have a keen interest in ancient carvings and paintings, petroglyphs, hieroglyphs etc. Creating a picture in the clay seemed particularly challenging, so I was keen to start straight away.

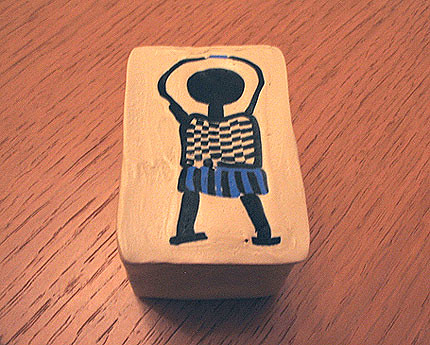
Fortunately I had some half used blocks of clay which were perfect for the task; sahara, black and blue. I decided to throw all caution to the wind in terms of the amount used and just conditioned whatever I had. So following the instructions in the books I started by making a checkerboard cane and then continued to construct the man by creating the head, arms and legs from black clay. It took me quite a while to construct (about 2 hours in fact) but at the end this is the result. It's a fairly large block and I used up all of my sahara, but I can see how making a large block like this means you are more likely to maintain the proportions of the picture.

I was a little disappointed with the feet because I rushed this part and of course the result is that they are not quite formed properly. However I was very careful in this case to constantly clean my hands with wipes, particularly after conditioning some dry black clay which is particularly dangerous for contaminating other colours.

The end result was fairly satisfying. The cane will need to be reduced and then I would like to add a border around it, maybe several different borders if I cut the block into pieces. I have decided to leave this piece to rest for a while before doing anymore to it, basically because I used some brand new sahara which, when conditioned, became extremely soft, so that when I cut through the core, the blade was dragging it rather than cutting it clean.

I do find that by trying out different exercises like this means I now feel more confident in my use of the clay, in understanding how to work it, how to avoid some of the basic errors I made at the start. I have learnt for example that the driest clay can be squeezed and "warmed up" in the hands and that this is a better technique than trying to condition it in the pasta machine. I find that some of the basics which seemed quite challenging at first, now don't seem so difficult once you get a better understanding of the clay.

Sunday, 13 June 2010

Almost...but not quite

Chocolate jelly roll

Last week I took the plunge and bought Donna Kato's Millefiori techniques book. Admittedly trying to mimic anything that she does seems rather too ambitious, but her work is an inspiration if unattainable.

The initial part of the book was actually very useful for laying down some basics, such as choosing the right clay, storage etc. (It was useful to learn for example that Fimo is the hardest clay to use, so it makes sense for me to use Fimo Soft just to make the process that little bit easier.)

Surprisingly many of the tutorials in the book seemed achievable, although putting them into practrice may be considerably more difficult! I am yet to find out. Despite this I was drawn to one photograph near the beginning of the book, which had not even been created by the author herself. For some reason this particular piece of jewellery took my interest, so rather than starting to follow one of the tutorials, I decided I would try to recreate some of the beads in the photo.

For this I bought three packs of clay, chocolate, caramel and sahara in Fimo Soft. Donna Kato's instructions for creating a jelly roll cane were very helpful and I found this part of the process quite easy. The next step involved following her instructions on creating a stripy border. Again this was a fairly simple process of creating the stack and placing the strips around the outside. Then wrapping a layer of chocolate around the outside of the cane. All well and good so far.

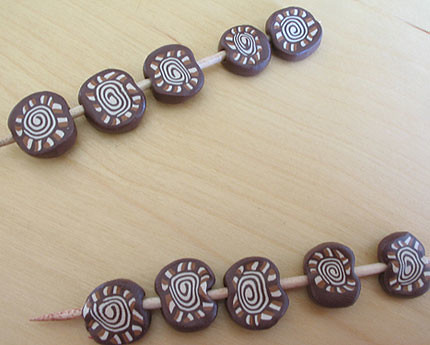
The problems arose when I started slicing the cane and discovered that I was distorting the shape. I took an unused blade and sliced with that, confirming the fact that the blade I had been using was in fact blunt. With the new blade I sliced about 10 slices off the cane with the aim to bake them as flat round beads. Unfortunately I had sliced them too thin because, as you can see from the photo, the cocktail stick distorted the shape as I pierced them through.

I decided not to bake the final beads and have to admit that this minor setback left me feeling somewhat despondent. But from all of this I can say I have learnt something valuable, something which Donna in her book had also commented on. The problem was in the size of the cane to begin with. It was just too small. Far better to create a larger cane and reduce down. This no doubt retains the shape and pattern of the cane when slicing. I have been working on false economy; trying to use less clay in my projects which in fact has just resulted in more waste. My aim is to get back to the basics, roll a suitably sized cane that will retain its shape.

Sunday, 30 May 2010

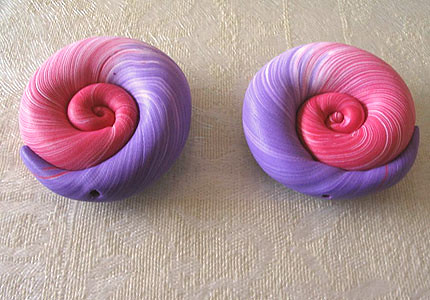
Lollipop

Lollipops

With the skinner blend sorted out, I really wanted to try something with my new skill. I found this little project in one of my books 'How to make polymer clay beads' by Linda Peterson. What is nice about this project is the minimal amount of materials needed for the task: just three colours of clay. For this I chose a red, white and a purple clay. (I have only ever tried using Fimo so far.)

This time I used the pasta machine. It's very good for conditioning bits of my left over clay to transform a crumbly mess into something usable. I find that passing it through the pasta machine a few times helps to create a usable sheet. I then used the tissue blade to cut three triangles of each colour and place them side by side to form a sheet. By rolling them into a small cane you are effectively creating the graduation of colour needed to make a skinner blend. You then roll this out with the rolling pin so that you have a stripy sheet. I must say at this point I didn't quite understand where all this was going. The instructions told me to pass the sheet through the pasta machine five times. I did this before realising that you need to fold it in between passes! Then I realised of course that it's the same process I took using the rolling pin - folding and rolling to make a basic skinner blend.

By cutting the finished sheet into pieces and then stacking, followed by slicing, something miraculous happens. A pattern emerges from the irregularity of the stacked sheets. Just seeing how easily this is done brought a smile to my face.

Now you can lay the pieces on a background sheet and use to wrap around a log of clay. (I used the scraps I had cut to form the base bead.) I found you have to be careful when pinching the ends of the log together, as you don't want to mess up the stripy design. Giving it a careful twist means you get the nice swirling effect of the two colours combining. You then thin the ends down and curl the log of clay up to form the lollipop.